


Installation and User Manual for TOTO Built-in Bathtubs with Standard Skirts
Currently, TOTO bathtubs are premium bathroom fixtures chosen by many families for their luxurious design, high durability, and superior relaxation experience. However, due to their large size and complex structure, the installation of built-in and skirted bathtubs must be carried out correctly to ensure safety, prevent leaks, and increase the product's lifespan.
In this article, Cuong Lam will provide detailed instructions on how to install and use TOTO built-in & skirted bathtubs, helping you use them with peace of mind for a long time.

1. Safety Notes Before Installation And Use
Before proceeding with the installation, please read the safety notes carefully and keep the document for future reference.
🔔 Meaning of symbols in the instructions

Mandatory: Must be followed to avoid risks and damage.
Prohibited: Absolutely do not perform to ensure safety.
✅ Mandatory regulations
Install correctly according to the technical instructions to avoid leaks that cause property damage.
Install the drain pipe accurately, without bending or deformation.
Inspect the product before installation to ensure there are no cracks.
Wrap the bathtub in cardboard throughout the construction process to prevent scratches.
❌ Things absolutely not to do
Do not hold the grab bar when moving the bathtub.
Do not place flammable objects (cigarettes, lighters, etc.) on the tub.
Do not allow the bathtub to collide strongly or have heavy objects fall on it.
Do not stand or sit on the bathtub rim.
2. Installation Instructions For TOTO Built-In & Skirted Bathtubs

Step 1: Determine the Installation Direction
The side with the drain hole must always be flush against the wall.
The bathtub can be installed on the left or right.
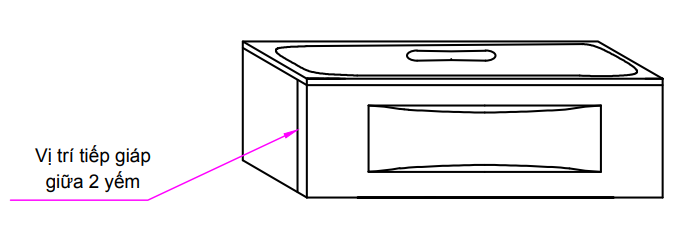
Note the two skirt installation sides to perform the next steps.
Step 2: Assemble the Grab Bar & Drain Set
Install the grab bar in the exact position specified by the manufacturer.

Install the drain set, ensuring it is tightly fitted and leak-free.

Step 3: Install the Bathtub Skirt
Step 3.1: Install the mounting brackets
Mark and screw the mounting brackets into the long and short sides of the bathtub.

Step 3.2: Install the skirt hinges
Install the hinges on the long skirt according to the marked positions.
Attach the short skirt to the long skirt, ensuring the standard technical gap.

Step 3.3: Install the bathtub support bar
The distance from the edge of the support bar to the bathtub leg is ~5mm.
Securely screw it in place.
Notes when installing the skirt
The skirt edge must fit tightly against the mounting bracket.
The two skirt panels must be flush against each other without gaps.
The skirt must be perpendicular to the floor before tightening the bolts.
Step 4: Flip the Bathtub & Secure the Bathtub Legs
Prepare the mortar
Ratio: 1 cement : 3 sand
Mortar layer thickness: 15–20mm
Width should not exceed 50 x 108mm
Proceed
Place the tub on leveling bricks to install the drain pipe.
Remove the leveling bricks and lower the bathtub legs onto the mortar.
Check the balance with a spirit level.
Adjust the gap to a maximum of ≤ 5mm for silicone sealing.
Step 5: Complete the Installation

Wait 24 hours for the mortar to dry completely.
Apply silicone sealant:
Between the bathtub and the wall
Between the skirt and the floor
Re-check overall – installation complete.
3. Instructions for Using & Maintaining the TOTO Bathtub
🔹 Handling red rust stains
Cause: iron in the water source or environment.
Treatment: use toothpaste + a soft cloth to wipe gently.
🔹 Soap scum
Due to the reaction between soap and calcium in the water.
Clean the bathtub regularly to prevent long-term buildup.
4. Conclusion
Correct technical installation and proper use will help the TOTO built-in & skirted bathtub:
Last for a long time
Be safe to use
Maintain its luxurious beauty in the bathroom
Cuong Lam hopes this article will help customers have a complete relaxation experience with the genuine TOTO bathtub.
-------------------------------------------
Learn more information about the Cuong Lam Distributor
Email: info@cuonglam.com
Website: www.cuonglam.com


